Most Common Editing Corrections - Part Two
Part Two of a Three Part Series
Welcome back to my three part series on how to add some Wow to your sports photos. As we discussed in Part One, I will be giving you some easy tips that you can do with any photo manipulation software on your computer. Check out my previous article entitled Photo Editing Programs for a list of potential programs starting at no cost and running up to a few hundred dollars. The corrections I am giving you are fairly common so even the simplest programs should give you these options. In Part One we discussed Levels, Color Balance and Sharpening. With those adjustments you were able to tweak your contrast levels, coloring and crispness of your sports photos. In this installment, we will look at Burning, Dodging and Saturation.
The first two adjustments we will talk about have their beginnings in the good old photo lab. Perhaps you are familiar with how those worked. Negatives were inserted into a holder and placed it inside the enlarger. A light was projected through the negative throwing an image down on an easel where you put the light sensitive paper. The paper was then sent through a series of wet baths and Voila, you had a print. Because the image started as a negative, any dark parts of the print were lighter on the negative. So if the player’s jersey was black, on the negative, the jersey was clear. So when you projected light through the negative, more light went through that area and “burned’ in hotter or darker on the print. In contrast, whatever was dark on the negative came out lighter on the print. So when you were printing, if you wanted to make a bright part of the print darker, you had to hit the light again, mask out the light with your hands and just open up a tiny opening and let more light hit just that spot. You were doing some Burning. If you had a spot on the print that was going too dark, you might need to use a tool to Dodge the light from hitting the paper to prevent it from getting too dark. In Photoshop, the tool icon for a Burn is still a fist with a slight opening in the center and an icon of a wand for the Dodge because that is how you would hold some of the light back.
Now keep that theory in mind as we move away from the darkroom and into our modern day image editing.
Burning
Now you understand the background of the term Burn, let’s talk about how to use it to your advantage in your photo editing software. Let’s say you have an image that you really like, except for the fact that one area of the image is just too bright. You just need to tone it down a bit to allow the detail to come through. You would select the Burn Tool and then go over the area you want darker. You can control the size of the burn area and you can also control how much is darkened with each pass. Don’t over think it. Get in there and play around. It is not very difficult and it can make a huge difference.
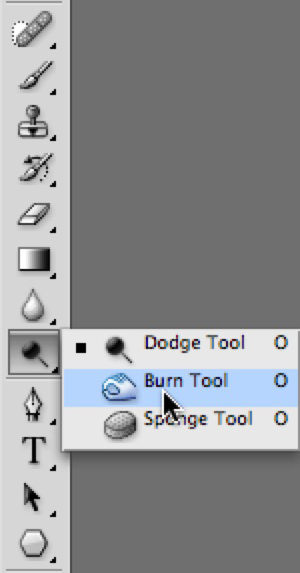
Dodging
This is a tool that can be very helpful, especially with sports images. By simply choosing the Dodge Tool, you can gently reach into a part of your image that is going too dark, and make it lighter in small increments. There are all kinds of sports where the athlete is wearing a helmet. While that is a fantastic safety addition to the uniform, it can cause all kinds of grief for a photographer. You may have a fantastic action image and the thing that would make it even better, would be if you could see the player’s eyes and facial expression. That is after all, the emotional element of the image. By using the Dodge Tool, you can reach in and easily tone down the blacks so that the details of the face can start to come back into the mix.

Saturation
We haven’t touched on this element yet but it is one that can instantly add pop to your image. Saturation controls the richness and intensity of the colors in your photo. By simply raising the level of saturation in your software, you can really make that green field come alive or add color back to the faces or give that blue jersey an extra bit of life. You don’t need much but it will make all the difference in the world. You will most likely also have the option to use a Sponge tool, which can add saturation or, in some cases, remove saturation in specific areas. Maybe you add a color pop to the turf but tone back the saturation on the jersey.
Get in there and give it a try. Once you are able to make these corrections, you will wonder why you never did it before. Have a blast.

Scott Quintard is a professional photographer based in southern California and a 25 year sports photography veteran who specializes in teaching parents and aspiring photographers about how to capture sports imagery. Credits include 12 years as the official team photographer for the UCLA Bruins and a seasoned contributor for NFL Properties, MLB, NBA and NCAA. Scott is a husband and father of three young athletes. See more of Scott's offerings at www.sportspicpro.com.
NEW! Free Sports Organization Resources
All of TeamSnap's ebooks, articles, and stories in one place. Access Now
Similar Articles:
Most Common Editing Corrections - Part Two
Part Two of a Three Part Series Welcome back to my three…
Read More
Photo Editing Programs | Sports Club Management
If you ever want to get inspired about sports photography,…
Read More
Most Common Editing Corrections
Part One of a Three Part Series Have you ever seen an amazing…
Read More